- Home
- About
- Blog
- For Parents
-
Corners
- Allison’s Corner
- Amber’s Category
- Andrea’s Corner
- Ashley’s Corner
- Brandi Jo’s Corner
- Brittany’s Corner
- Brooke’s Corner
- Catrina’s Corner
- Conservation
- Desiree’s Corner
- Emily’s Corner
- Erica’s Corner
- Erin’s Corner
- Heather’s Corner
- Ivory’s Corner
- Jeana’s Corner
- Katie’s Corner
- Kelly’s Corner
- Kelsey’s Corner
- Kendra’s Corner
- Liberty’s Corner
- Lisa’s Corner
- Meagan’s Corner
- Melissa’s Corner
- Mimi’s Corner
- Morgan’s Corner
- Nicole’s Corner
- Sarah’s Corner
- Savannah’s Corner
- Shannon’s Blog
- Sharon’s Corner
- Sherri’s Corner
- Tara’s Corner
- Contact
- Guest Post

More than Decoration
As fog lifted from the green field, a powerful gobble broke the silence of the crisp Spring morning. Moments later a separate gobble sounded across the river and then another. Multiple toms were near and the excitement was making it hard to sit still. Grinning from ear to ear I adjusted my face mask. This was the moment I had been waiting for, opening weekend of Spring turkey season.
Tucked away in the timber line, I waited and watched as a group of hens flew down from the trees and began to feed. Uninterested in the decoy set up the hens slowly made their way out of sight into another field. From the corner of my eye I caught movement and quickly got my cameraman’s attention. Across the field was a beautiful turkey in full strut. With a few scratches on the slate call, the tom was gobbling and showing interest. It wasn’t long until the tom spotted the decoys and decided he liked what he saw. With eyes locked on the foam hen the tom put on a show. He quickly made his way to the decoys; fan spread, chest puffed out, and beard dragging the ground. The turkey strutted his way down the end of my shotgun and I gently squeezed the trigger at 12 yards. Walking to the truck with the turkey slung over my right shoulder and my first successful hunt on camera; I knew this would be a hunt I would never forget.
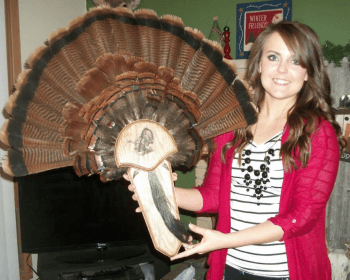
When I see the gobbler mounted on my wall, memories come rushing back. Fan mounting a turkey is a great way to preserve a memory and display a hunting trophy. Having a mount in my home not only lets me reminisce about the hunt but it allows me to share the story with those who were not there.
Normally, taxidermy work should be left to the professionals; however, mounting a turkey fan is inexpensive and can easily be done at home. The first step to mounting a turkey fan starts with a clean bird. Wash any dirt or blood off the fan, beard, and spurs.
The Beard- Start by removing the beard first. Cut the beard at the base of the body and leave some skin attached to keep the beard together. Add borax or coarse salt to the raw area of the beard and let it sit a day or two until dry. I usually store the beard in a Ziploc bag with extra Borax to keep it from insects.
The Tail- Next remove the tail fan. Hold the fan closed and feel for a triangle shape that connects the base of the tail to the body. Carefully cut in front of the base and lay the fan on a flat, hard surface. Scrape the extra skin from the feathers and add a large amount of borax to the base of the tail to avoid mold. Shape and dry the fan by spreading it out to a full strut (or however you would like the fan to be displayed.) Put a small nail in front of the bottom feathers to hold it down. Arrange and smooth out each feather neatly. Keep in mind when the fan dries the feathers cannot be changed. Once the fan is arranged to your preference, put the fan in a location where it can dry flat for at least a week.
Spurs- Remove the leg at the knee joint. Saw through the leg on each side of the spur and remove any skin from the bone. The spur can be displayed by running leather or a string through the hollow bone.
After the tail is dry, remove it from the board and brush off any borax. The tail can be attached to a wooden display from a local sporting goods store or something made from home. If you are mounting the turkey on a store bought display, slide the fan into the back panel. Most displays will also have a hole for the beard to be attached. Simply add hot glue or epoxy to the end of the beard and insert it into the panel. Polyurethane can be added to the spurs to give a shiny finish and they can be attached to the display as well.

Amber,
This is a beautifully written article! I actually feel like I am there with you in the first paragraph. You have given me the urge to kill my first turkey this spring! Have you ever bow hunted a turkey?